
Quick Answer: How to do battery lawn mowers need servicing: A Step-by-Step Guide
Yes, battery lawn mowers need routine maintenance, but they usually require far less servicing than petrol models. You mainly need to clean the cutting deck, inspect and sharpen the blade, care for the battery, check fasteners, and store the mower correctly. Regular upkeep improves cutting performance, battery life, and safety.
Expert Summary>
– Battery lawn mowers do not need oil changes, spark plug replacements, or fuel-system cleaning. – The most important maintenance jobs are battery care, blade inspection, deck cleaning, and safe storage. – Most owners can perform routine maintenance at home using basic tools and the mower’s instruction manual. – Professional servicing is usually needed only for motor faults, damaged wiring, battery errors, or major impact damage. – A short inspection before each mowing session can prevent expensive repairs and unsafe operation.
Step 1: Understand What Battery Lawn Mower Servicing Includes
Separate routine maintenance from professional servicing. Routine maintenance means the simple checks and cleaning you perform at home, while professional servicing involves diagnosis or repair by a qualified technician.
A battery lawn mower uses an electric motor powered by a rechargeable battery. Think of it as a large cordless power tool: there is no petrol engine, but the blade, battery, wheels, switches, and electrical connections still need attention.
Do electric lawn mowers need servicing?
Yes, electric lawn mowers need servicing when they develop mechanical or electrical faults, but scheduled workshop visits are not usually necessary for normal household use.
Unlike a petrol mower, a battery model has no:
- Engine oil to replace
- Spark plug to inspect
- Carburettor to clean
- Petrol filter to change
- Fuel tank to drain
- Pull-start mechanism to maintain
This simpler design reduces maintenance time and the number of parts that can wear out.
Maintenance versus repair
| Type of attention | What it means | Who can do it? | Typical examples |
|---|---|---|---|
| Routine maintenance | Regular care that prevents wear or poor performance | Most owners | Cleaning the deck, checking the blade, charging the battery |
| Minor repair | Replacing an accessible worn or damaged part | Owner or technician, depending on the manual | Replacing a wheel, blade, grass bag, or handle fastener |
| Professional service | Diagnosing electrical or motor-related faults | Authorised technician | Repairing wiring, motor controls, safety switches, or drive systems |
| Warranty service | Repair covered by the manufacturer’s warranty | Authorised service centre | Resolving a confirmed manufacturing defect |
Do not open the battery casing, motor housing, charger, or electronic control unit. These components can retain electrical energy and may contain parts that are not designed for home repair.
Tools and Materials Needed
Gather a few basic items before starting. You do not normally need specialist equipment for routine battery lawn mower maintenance.
| Tool or material | What it is used for | Is it essential? |
|---|---|---|
| Protective gloves | Protecting your hands from the blade and sharp debris | Yes |
| Safety glasses | Keeping dust and dried grass out of your eyes | Recommended |
| Stiff nylon brush | Removing grass from the cutting deck and vents | Yes |
| Plastic scraper | Lifting compacted grass without damaging the deck | Recommended |
| Dry or slightly damp cloth | Wiping the mower housing and battery compartment | Yes |
| Correct-size wrench or socket | Removing or tightening the blade bolt | Only for blade work |
| Torque wrench | Tightening a bolt to the manufacturer’s exact force setting | Recommended for blade replacement |
| Blade sharpener or file | Restoring a dull cutting edge | Optional |
| Manufacturer-approved replacement blade | Replacing a bent, cracked, or badly worn blade | As needed |
| Mower instruction manual | Confirming safe procedures and specifications | Essential reference |
A torque wrench is a tool that measures how tightly a bolt is fastened, much like a measuring cup controls how much liquid you add. Using the correct setting helps prevent a blade bolt from being dangerously loose or excessively tight.
Step 2: Make the Mower Safe Before Servicing
Remove the battery and safety key before touching the blade or cutting deck. This is the single most important safety step because it prevents the mower from starting unexpectedly.
Follow this shutdown sequence:
- Release the operating handle or blade-control lever.
- Wait until the blade stops completely.
- Turn off the mower if it has a separate power switch.
- Remove the safety key, if fitted.
- Remove the battery pack.
- Allow hot components to cool.
- Put on protective gloves.
Never rely only on the power button. A battery mower can start immediately when its controls are activated because an electric motor does not need to crank like a petrol engine.
Position the mower correctly
Check the instruction manual before tipping the mower. Some models can be placed vertically for cleaning or storage, while others must remain in a specified position.
Support the mower securely so that it cannot fall or roll. Keep your hands away from the blade edge even after the battery has been removed.
Safety warning: Never inspect the underside while the battery is installed. Do not ask another person to hold the controls while you work beneath the mower.
Step 3: Clean the Cutting Deck After Use
Remove grass buildup from the underside of the mower after the machine is safe and dry. The cutting deck is the protective housing around the blade, similar to a shield that contains grass clippings and flying debris.
Compacted grass restricts airflow. Because mower blades depend on moving air to lift and cut the grass, a blocked deck can leave uneven strips, reduce collection performance, and make the motor work harder.
How to clean the deck
- Remove the battery and safety key.
- Position the mower according to the manual.
- Use a plastic scraper to loosen thick grass deposits.
- Brush away dry clippings with a stiff nylon brush.
- Wipe remaining dirt with a slightly damp cloth.
- Allow all surfaces to dry before reinstalling the battery.
Avoid metal scrapers because they can scratch protective coatings or damage a plastic deck.
Can you wash a battery lawn mower with a hose?
Usually, you should not spray a battery lawn mower with a hose or pressure washer unless the manufacturer specifically permits it. Pressurised water can enter bearings, switches, vents, battery terminals, or electronic components.
A damp cloth and brush are safer for most models. Never immerse the mower, charger, or battery in water.
Keep the motor vents clear
Air vents allow heat to leave the motor and electronic control system. Think of them as the mower’s breathing openings: blocked vents can trap heat and reduce performance.
Brush dust and grass away gently. Do not push tools, compressed air nozzles, or water deep into the ventilation slots.
Step 4: Inspect and Maintain the Blade
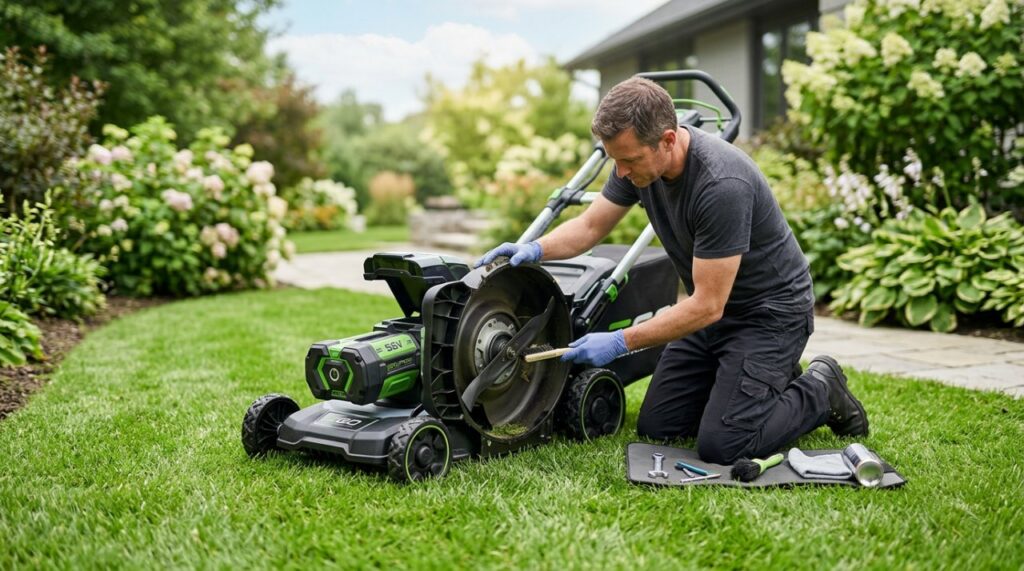
Check the blade regularly for dull edges, dents, cracks, bending, and excessive wear. A sharp, balanced blade cuts cleanly, while a damaged blade can vibrate, tear grass, and place extra strain on the motor.
Inspect the blade:
- Before the first use of the mowing season
- After striking a stone, root, branch, or metal object
- When the mower begins vibrating unusually
- When grass tips look torn rather than cleanly cut
- After several mowing sessions during heavy use
- Before long-term storage
How to recognise a dull blade
A dull blade often leaves grass with shredded, pale, or brown tips. This happens because the blade tears the leaf instead of slicing it cleanly, much like using blunt scissors on paper.
Other warning signs include:
- Repeated passes are needed
- The lawn looks uneven
- Grass collection becomes less effective
- Mowing takes longer than usual
- Battery runtime appears to decrease
Poor runtime is not always a battery problem. A dull blade or grass-blocked deck can increase resistance and force the motor to consume more energy.
Sharpen or replace the blade?
| Blade condition | Recommended action |
|---|---|
| Cutting edge is mildly dull | Sharpen it evenly |
| Small nicks are present | Sharpen if enough blade material remains |
| Blade is bent | Replace it immediately |
| Cracks are visible | Replace it immediately |
| Mounting hole is damaged | Replace it |
| Heavy corrosion or thinning is visible | Replace it |
| Vibration continues after sharpening | Check balance or replace the blade |
A blade must remain balanced, meaning both sides have approximately equal weight. An unbalanced blade spins like a washing machine with all the clothes on one side, creating vibration that can damage bearings and fasteners.
How to remove a mower blade safely
- Remove the battery and safety key.
- Wear thick protective gloves.
- Secure the mower in the approved position.
- Mark the blade’s upper and lower orientation.
- Prevent the blade from turning with a suitable wooden block or approved blade-holding tool.
- Loosen the blade bolt using the correct wrench or socket.
- Keep washers and mounting parts in their original order.
- Inspect the blade and mounting area.
Installation direction matters. A blade fitted upside down may move air incorrectly and cut poorly, even if the motor appears to operate normally.
When to use a professional
Ask a dealer or repair shop to handle the blade if:
- You are uncomfortable working near sharp parts
- The bolt is seized
- You do not have the correct tools
- The blade adapter appears damaged
- The mower vibrates after a new blade is installed
- You cannot confirm the required tightening specification
Blade maintenance is not technically difficult, but it must be done carefully. Paying for blade sharpening or replacement is a sensible choice if you are uncertain.
Step 5: Care for the Battery and Charger
Protect the battery from heat, moisture, deep discharge, and physical damage. The battery is usually one of the most expensive parts of a cordless mower, so correct charging and storage can significantly affect ownership cost.
Most modern battery lawn mowers use a lithium-ion battery. Lithium-ion is a rechargeable battery technology also used in phones, laptops, and cordless drills because it stores substantial energy without being excessively heavy.
Charge the battery correctly
Use only the charger approved for the battery system. A charger may physically fit or use a similar plug but still deliver the wrong voltage, current, or electronic communication.
For routine charging:
- Let a hot battery cool before charging.
- Place the charger on a hard, dry, well-ventilated surface.
- Keep it away from direct sunlight and flammable materials.
- Insert the battery as directed.
- Check the charger’s status lights.
- Remove the battery when charging is complete if the manual recommends doing so.
- Store the charger indoors.
Do not cover the charger while it is operating. Charging creates heat, and the charger needs airflow to release it.
Avoid extreme temperatures
Batteries perform best in moderate indoor conditions. Excessive heat speeds up internal ageing, while very cold conditions can temporarily reduce available power.
Do not routinely store a battery in:
- A hot car
- Direct sunlight
- A damp shed
- An uninsulated area exposed to freezing conditions
- A location near heaters or open flames
Let a very cold battery return to an acceptable charging temperature before connecting it to the charger. Follow the temperature limits stated by the manufacturer.
Inspect the battery before use
Stop using the battery if you notice:
- Cracks or impact damage
- Swelling or a distorted casing
- Leaking material
- Burn marks
- Corroded terminals
- An unusual chemical smell
- Excessive heat during normal use
- Repeated charger error warnings
Place a questionable battery away from combustible materials without touching leaking material. Contact the manufacturer, retailer, or an approved battery recycling facility for instructions.
Do not place a lithium-ion battery in household rubbish. Battery terminals can short-circuit, generate heat, and create a fire risk during waste processing.
Prepare the battery for long-term storage
Follow the manufacturer’s recommended storage charge level. Some brands advise partial charging rather than storing the battery completely full or empty for several months.
Check stored batteries periodically. If the charge falls below the recommended level, recharge according to the manual.
Step 6: Check Wheels, Handles, Cables, and Fasteners
Inspect the mower’s external parts before each use and perform a closer check periodically. Vibration, impacts, and folding the handle can gradually loosen or damage components.
Check the following areas:
- Wheel attachment points
- Cutting-height adjustment lever
- Handle joints and locking knobs
- Grass bag or collection box
- Safety key
- Battery cover and latch
- Start button and operating handle
- Visible cables
- Blade bolt and accessible fasteners
- Self-propelled controls, if fitted
A self-propelled mower uses motor power to turn its wheels, so you guide it rather than pushing its full weight. These models contain additional drive parts and may require belt, gearbox, or wheel-drive attention that a basic push mower does not.
Tighten only what the manual allows
Use the correct tool and tightening specification. Over-tightening can strip threads, crack plastic mounts, or make folding handles difficult to operate.
Do not remove safety guards or bypass switches. These features are designed to stop the blade when the operating handle is released or when another unsafe condition is detected.
Inspect folding cables carefully
If the mower has a folding handle, make sure electrical cables are not pinched, stretched, or trapped at the hinge. Repeated folding can damage a cable if it is routed incorrectly.
Stop using the mower if you see exposed wires or damaged insulation. Electrical cable repairs should normally be handled by an authorised technician.
Step 7: Store the Mower Correctly
Store the mower clean, dry, secure, and disconnected from its battery. Good storage prevents corrosion, accidental starting, pest damage, and avoidable battery deterioration.
Before storing it for an extended period:
- Remove the battery and safety key.
- Clean the cutting deck.
- Inspect the blade.
- Empty and clean the grass collector.
- Tighten accessible loose parts.
- Wipe down the housing.
- Let the mower dry completely.
- Store it in the manufacturer-approved position.
- Keep the battery indoors under suitable conditions.
- Store the safety key separately from the mower.
Can a battery mower be stored vertically?
Some battery mowers are designed for upright storage, but vertical storage is safe only when the manufacturer approves it. The handle may fold and the mower may stand against a wall, reducing the amount of floor space required.
Use any fitted storage locks or supports. Make sure the machine cannot fall onto a person, child, pet, or vehicle.
Prevent accidental access
Keep the battery and safety key out of reach of children. Removing both creates two separate barriers against accidental starting.
Do not place heavy items on top of the mower, battery, or charger. The plastic housings protect internal electrical parts but are not intended to support storage loads.
Step 8: Follow a Simple Maintenance Schedule
Use condition and operating hours rather than relying only on calendar dates. A mower used twice a week on a large, dusty property needs more attention than one used occasionally on a small lawn.
| Maintenance task | Before each use | After each use | Every few weeks | Before long-term storage |
|---|---|---|---|---|
| Check battery for damage | ✓ | ✓ | ✓ | |
| Check blade condition | ✓ | ✓ | ✓ | |
| Remove deck buildup | ✓ | ✓ | ||
| Clear ventilation openings | ✓ | ✓ | ✓ | |
| Inspect wheels and handles | ✓ | ✓ | ✓ | |
| Check visible cables | ✓ | ✓ | ✓ | |
| Check accessible fasteners | ✓ | ✓ | ||
| Clean grass collector | ✓ | ✓ | ||
| Check battery charge | ✓ | ✓ | ✓ | |
| Review unusual noise or vibration | ✓ | ✓ | ✓ |
The instruction manual takes priority over a general schedule. Different mower designs may have specific blade, storage, battery, or drive-system requirements.
Do Battery Lawn Mowers Need Servicing Every Year?
Most battery lawn mowers do not require mandatory annual workshop servicing unless the manual, warranty, or usage conditions call for it. An annual owner inspection is still useful, especially before the main mowing season.
A professional yearly check may be worthwhile if:
- The mower receives heavy commercial use
- It has a self-propelled drive system
- It has suffered repeated impacts
- You cannot sharpen or balance the blade safely
- Runtime has dropped suddenly
- Electrical warning lights keep appearing
- The manufacturer specifies periodic dealer servicing
- Warranty terms require documented inspections
Keep purchase receipts, service records, and battery serial numbers. These documents can make a warranty claim easier if a fault develops.
Do Electric Lawn Mowers Need Maintenance?
Yes, electric lawn mowers need maintenance even though they do not have petrol engines. Cleaning, blade care, electrical inspection, and correct storage are still necessary for safe and efficient mowing.
The answer is similar for corded and battery-powered machines, but corded models require extra attention to the power lead.
Corded electric mower checks
Before using a corded mower, inspect:
- The full length of the extension lead
- Plug pins and connectors
- Cable insulation
- Strain-relief points
- The mower’s power inlet
- Any outdoor electrical protection required in your region
Never use a damaged cable. Keep the lead behind you and away from the cutting path while mowing.
Do Lawn Mowers Need Tune-Ups?
Battery lawn mowers do not need traditional engine tune-ups, but they benefit from periodic inspections and blade maintenance. A tune-up usually refers to adjustments and replacement parts that keep a petrol engine running correctly.
A petrol mower tune-up may involve changing the spark plug, replacing oil, cleaning the carburettor, or changing air and fuel filters. None of these tasks applies to a standard battery mower.
For a battery model, the closest equivalent to a tune-up is: