
Do Lawn Mowers Come Assembled? Here’s What to Expect Before You Start Cutting
Most lawn mowers do not come fully assembled out of the box. Depending on the type and brand, you’ll need to attach the handle, install the blade, add oil, and sometimes fuel — a process that takes 15–45 minutes for most homeowners.
Expert Summary
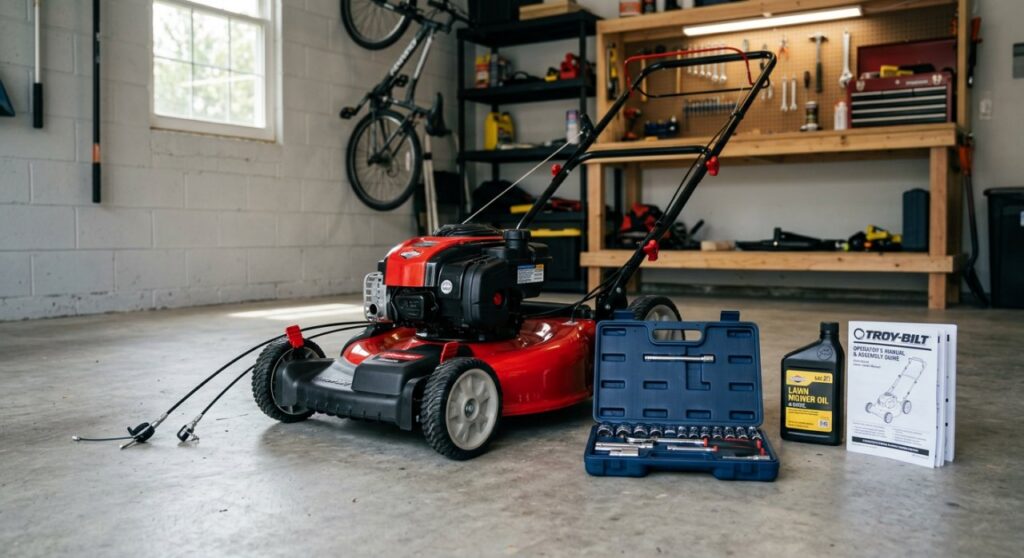
- Most walk-behind mowers ship partially assembled: the deck is pre-built, but handles, wheels, and sometimes blades require attachment.
- Riding mowers and zero-turn mowers often require more involved assembly — including seat installation, battery connection, and deck leveling.
- Robotic mowers come nearly fully assembled but require boundary wire installation or app-based perimeter mapping.
- Oil is rarely pre-filled — most gas mowers ship dry to prevent leaks during shipping; always check before first start.
- Assembly time ranges from 15 minutes (electric push mowers) to 2–3 hours (riding mowers) depending on model complexity.
What “Partially Assembled” Actually Means for Different Mower Types
The level of assembly depends entirely on the mower category. Understanding this upfront prevents the frustration of opening a box and not knowing what to expect.
Here’s a quick breakdown by mower type:
| Mower Type | Typical Assembly Level | Average Assembly Time |
|---|---|---|
| Walk-behind push mower (gas) | Partial — handle, blade guard, sometimes blade | 20–40 min |
| Walk-behind push mower (electric/battery) | Minimal — handle and battery setup | 10–20 min |
| Self-propelled mower | Partial — handle, drive cable, grass bag | 30–45 min |
| Riding lawn mower | Moderate — seat, steering wheel, battery, deck | 1–3 hours |
| Zero-turn mower | Moderate to heavy — lap bars, seat, battery, deck | 1.5–3 hours |
| Robotic mower | Light — boundary setup, app config | 30–90 min |
| Reel mower (manual) | Minimal — handle attachment only | 10–15 min |
The deck — the main cutting housing — almost always arrives pre-assembled and-welded at the factory.
Tools and Materials You’ll Need Before You Start
Gather everything before opening the box to avoid interrupting assembly mid-process.
| Tool / Material | Required For |
|---|---|
| Adjustable wrench or socket set | Bolting handle, wheels, blade |
| Torque wrench | Blade bolt tightening (critical for safety) |
| Flathead and Phillips screwdrivers | Cable clips, guards, panel covers |
| SAE 30 or 10W-30 motor oil | First fill on gas mowers |
| Fresh gasoline (87 octane minimum) | Gas-powered mower startup |
| Nitrile gloves | Handling blade safely |
| Owner’s manual (printed or PDF) | Model-specific torque specs |
Step 1: Unbox and Inventory All Parts
Before touching any components, lay everything out and verify against the parts list in your manual.
Manufacturers include a parts sheet — usually on page 2–4 of the manual — listing every bolt, clip, handle section, and accessory. Missing parts are common and far easier to address before assembly than after.
- Remove all components carefully and place on a clean flat surface.
- Count and match each item to the parts diagram.
- Set aside the manual in a visible location — you’ll reference it constantly.
- Do not discard the box until assembly is complete and the mower starts successfully.
⚠️ Warning: Some bolts ship pre-installed in cardboard inserts or taped to components. Check all foam padding before assuming a part is missing.
Step 2: Attach the Handle Assembly
This is the most common assembly step across all walk-behind mower brands. Handles ship folded or detached to reduce box size during shipping.
Step 2a: Identify Upper and Lower Handle Sections
Most handles come in two parts — upper and lower. The lower section often attaches directly to the mower deck pivot brackets.
- Align the lower handle with the rear deck mounting points.
- Insert the provided cariage bolts through the bracket holes.
- Hand-tighten the wing nuts or hex nuts first before fully torquing.
Step 2b: Connect the Upper Handle and Control Cables
- Slide the upper handle into the lower handle sleves.
- Align the cable routing clips along the handle frame.
- Thread the blade engagement cable (bail lever cable) through its guide and connect to the carburetor or blade brake clutch — your manual will show the exact connection point.
- Connect the drive cable if your mower is self-propelled — this runs to the transmission housing near the rear wheels.
Step 2c: Torque All Handle Bolts
Do not skip torquing. Loose handle bolts create vibration fatigue and can cause the handle to shift under load.
- Most manufacturers specify 15–25 ft-lbs for handle mounting bolts.
- Use a torque wrench if available, or firmly snug with an adjustable wrench and verify no play exists.
Step 3: Install the Grass Catcher or Bag
The rear bag or side discharge chute typically requires a simple clip-on attachment but is easy to install incorrectly, causing poor grass collection.
- Open the rear discharge door or side port cover (depending on model).
- Hook the bag’s upper wire frame into the door hinge slots.
- Confirm the bag hangs freely and the door can open and close around it.
- For side-discharge chutes, align the mounting tabs and press firmly until you hear a click or feel resistance.
💡 Pro Tip: Test the bag attachment by gently pulling down on the bag. If it detaches easily without pressing a release tab, re-seat it — loose bags spill clippings and reduce suction.
Step 4: Check Whether Your Mower Comes With Oil Installed
This is one of the most critical — and most overlooked — steps. Most gas-powered lawn mowers are shipped without oil to prevent leaks during transport.
Are Lawn Mowers Assembled With Oil?
No — the vast majority of gas mowers are not pre-filled with oil at the factory. Starting a dry engine causes immediate and irreversible damage to the crankshaft and bearings within seconds.
There are a few exceptions:
- Honda GCV series engines on some mowers ship with oil pre-filled — always verify via dipstick regardless.
- Some big-box store floor models may have been prepped by staff — still verify before assuming.
- Electric and battery-powered mowers have no engine oil requirement whatsoever.
How to Add Oil to a New Gas Mower
- Locate the oil fill cap — usually yellow or marked with an oil can symbol near the engine base.
- Remove the dipstick and wipe it clean with a cloth.
- Add the recommended oil type — most residential mowers use SAE 30 in warm climates or 10W-30 for variable temperatures.
- Fill slowly — typical small engines hold 15–20 oz (450–600 ml) of oil.
- Reinsert the dipstick, remove again, and check the oil level sits between the MIN and MAX marks.
- Do not overfill — excess oil causes white smoke and foamy oil degradation.
⚠️ Warning: Check your specific engine manual (Briggs & Stratton, Honda, Kawasaki, Kohler) for the exact oil specification. Using the wrong viscosity can void your warranty.
Step 5: Install or Verify the Blade
On many new mowers, the blade ships inside the box separate from the deck — especially walk-behind models sold through retail chains.
- Put on nitrile or leather gloves before handling the blade — edges are sharp from factory.
- Tip the mower onto its side with the air filter and carburetor facing up (never down — this floods the carburetor with oil).
- Align the blade’s center hole with the crankshaft adapter.
- Note blade orientation — most blades are stamped with “THIS SIDE DOWN” or have a curved sail edge that must face up toward the deck.
- Thread the blade bolt by hand first, then torque to manufacturer specification — typically 35–50 ft-lbs for residential mowers.
- Use a blade block or piece of 2×4 wedged between blade and deck to prevent rotation while torquing.
💡 Pro Tip: Never use an impact wrench to install a blade bolt. Over-torquing strips the crankshaft adapter — a $150–$300 repair on a $300 mower.
Step 6: Add Fuel (Gas Models Only)
Use fresh, ethanol-free gasoline (87 octane or higher) whenever possible. Ethanol-blended fuels absorb moisture and degrade carburetor components within30–60 days of storage.
- Use an approved fuel container — do not fill directly from a pump nozzle without a clean funel.
- Fill to the bottom of the filler neck — do not overfill.
- Replace the fuel cap securely — fuel caps on new mowers are sometimes over-tightened and hard to remove; use a cloth for grip.
- If your mower has a primer bulb, press it 3–5 times to draw fuel into the carburetor before the first start.
💡 Pro Tip: Add a fuel stabilizer (such as STA-BIL) from day one if you’re in a seasonal climate. This prevents carburetor varnishing and is the single best preventative maintenance habit for small engines.
Step 7: Perform Pre-Start Safety Checks
Never skip this step on a brand-new mower. Factory assembly sometimes leaves shipping bolts, zip ties, or foam inserts near moving parts.
Work through this checklist before the first pull:
- [ ] All handle bolts are tight with no play
- [ ] Blade bolt is torqued to spec
- [ ] Oil level confirmed between MIN and MAX
- [ ] Fuel cap is secure
- [ ] Grass bag or discharge chute is properly attached
- [ ] No zip ties, foam, or cardboard near blade or wheels
- [ ] Blade engagement cable moves freely when bail lever is squezed
- [ ] Self-propel drive cable (if applicable) engages and releases smoothly
- [ ] Wheel height levers move and lock at all four positions
Step 8: Start the Mower for the First Time
The first start is a diagnostic as much as it is a startup. Watch and listen carefully.
For Gas Push Mowers:
- Set the choke to “FULL CHOKE” (or “START”) for a cold engine.
- Squeeze the bail (safety) lever on the handle.
- Pull the starter cord firmly — expect the first pull to require more effort than normal.
- After the engine fires and warms for 30–60 seconds, move the choke to “RUN” or “HALF CHOKE.”
- Let the engine idle for 2–3 minutes before engaging the blade or self-propel.
For Battery-Powered Mowers:
- Insert the fully charged battery — most new batteries ship at partial charge.
- Charge fully before first use for optimal battery calibration.
- Press the power button and squeeze the safety bar to engage the blade.
⚠️ Watch For: White smoke on first start is normal if minor oil residue is present on the engine exterior. Blue or grey smoke after2–3 minutes indicates overfilled oil. No start after5 pulls usually means the choke setting needs adjustment or the primer bulb wasn’t pressed.
Common Assembly Mistakes to Avoid
These are the errors that cause the most calls to manufacturer support lines:
- Starting without adding oil first — destroys the engine in under 30 seconds; the single most costly first-time mistake.
- Installing the blade upside down — the mower will spin but cut nothing; the blade’s curved sail creates the airflow needed to lift and cut grass.
- Routing cables behind instead of through handle clips — cables snap under tension after few uses.
- Ignoring torque specs — under-tightened blade bolts are a safety hazard; over-tightened handle bolts crack plastic brackets.
- Using old gasoline from a can stored over winter — varnished fuel clogs the carburetor on the first fill.
- Tipping the mower with the carburetor side down — floods the air filter with oil, causing smoking and rough running.
Pro Tips From Experienced Owners
💡 Photograph every step. Before you fold the handle up or attach the bag, take a quick phone photo. If something goes wrong or you need to re-assemble for storage, photos are faster than the manual.
💡 Register your mower online the same day. Most manufacturers (Husqvarna, Honda, Toro, Craftsman, EGO, Greenworks) offer a 2–3 year warranty that must be activated within 30 days of purchase.
💡 Buy a spare spark plug at the same time. New mowers occasionally ship with a defective plug from the factory. Having a spare avoids a second hardware store trip on day one.
💡 Check the oil again after the first 5 hours of use. New engines seat their rings during break-in and can consume a small amount of oil in the first few uses.
FAQ: Do Lawn Mowers Come Assembled?
Q: Do lawn mowers come assembled when you buy them from a store like Home Depot or Lowe’s?
No — retail box mowers require partial assembly. Some store associates offer paid assembly services at checkout, typically $20–$50. Floor display models may already be assembled but are often not the best choice due to potential use or fuel age.
Q: Are lawn mowers assembled with oil from the factory?
Almost never. Gas mowers ship without oil to prevent spills during shipping. Always add the correct oil before the first start. Electric and battery mowers require no oil.
Q: How long does it take to assemble a lawn mower?
Walk-behind mowers take 15–45 minutes. Riding mowers take 1–3 hours. Robotic mowers require 30–90 minutes primarily for boundary setup rather than mechanical assembly.
Q: Can I pay someone to assemble my lawn mower?
Yes. Big-box retailers offer in-store assembly at purchase. Independent small engine shops also assemble new mowers for $30–$75. Some brands like EGO and Greenworks partner with retailers for white-glove delivery with assembly included at the premium tier.
Q: Do riding mowers come assembled?
Partially. The main frame, engine, and deck typically ship pre-assembled, but you’ll still need to install the battery, connect the seat switch, attach steering components, and level the cutting deck before first use.
Conclusion
Do lawn mowers come assembled? No — but assembly is straightforward when you know what to expect. The key steps are attaching the handle, installing the blade correctly, adding oil before your first start, and fueling with fresh gas.
The single most important thing to remember: never start a new gas mower without checking oil first. That one step prevents the most common — and most expensive — first-time owner mistake.
Take 30–45 minutes, follow your manual, and you’ll have a fully operational mower that’s set up safely and correctly from day one.