
How to Protect Sprinkler Heads From Lawn Mowers
What this means for you is a reliable prevention plan starts with making every sprinkler visible, correctly positioned, and physically protected.
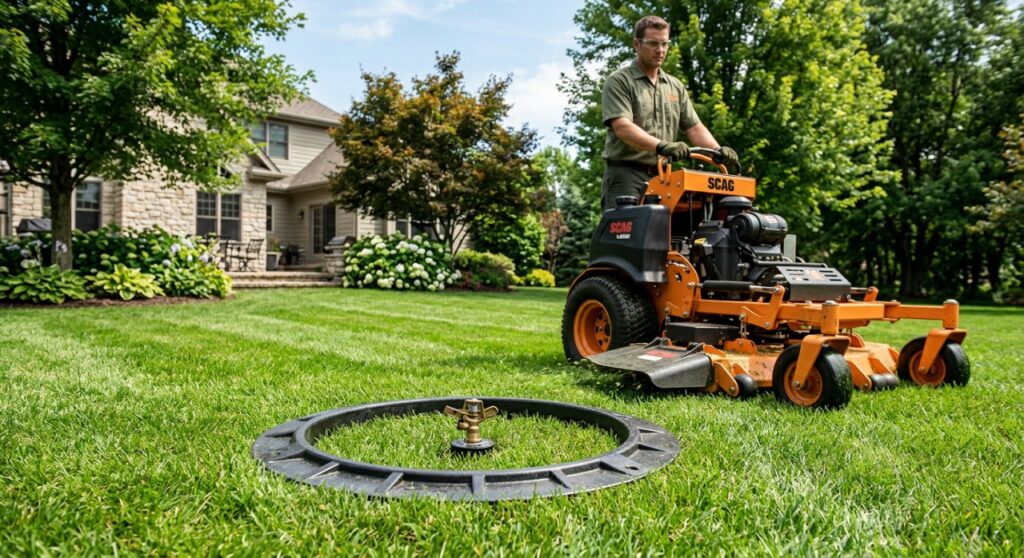
To master how to protect sprinkler heads from lawn mowers, mark each sprinkler, correct heads that sit too high, install guards where needed, and keep mower wheels and blades away from irrigation components. These steps prevent impact damage, reduce water waste, and help you avoid repeated repairs without affecting normal spray coverage.
Expert Summary
What this means for you is the following actions provide the fastest path to preventing mower damage.
- Mark sprinkler locations before mowing. Visible markers help operators avoid running wheels or mower decks over hidden heads.
- Keep pop-up sprinkler bodies level with the finished soil grade. A raised sprinkler is more likely to be struck by a blade, wheel, or deck.
- Use rigid guards in high-traffic areas. Protective rings transfer mower weight into the surrounding ground instead of the sprinkler body.
- Maintain clearance around each sprinkler. Overgrown grass hides irrigation parts and can interfere with pop-up movement.
- Test the system after yard work. Early detection limits erosion, underground leaks, and damage to nearby landscaping.
Tools and Materials Needed
What this means for you is most sprinkler protection work requires basic hand tools rather than specialized irrigation equipment.
| Tool or material | Primary purpose | Best use case | Main trade-off |
|---|---|---|---|
| Sprinkler flags | Makes heads easy to see | Large lawns or unfamiliar mowing crews | Must be removed or repositioned periodically |
| Rigid sprinkler guards | Shields the body from wheels and deck contact | High-traffic turf and lawn edges | Poor sizing may restrict spray |
| Flexible trim rings | Separates grass from the sprinkler | Residential lawns with light mower traffic | Offers less impact protection |
| Hand trowel | Removes soil around the sprinkler body | Height adjustment and guard installation | Can damage shallow irrigation lines if used carelessly |
| Small shovel | Creates a wider work area | Replacing or repositioning a sprinkler | Disturbs more turf |
| Irrigation riser or swing joint | Corrects sprinkler height and alignment | Heads installed above or below grade | Requires compatible fittings |
| Thread-seal tape | Helps seal threaded connections | Replacing compatible threaded parts | Not suitable for every irrigation connection |
| Grass shears or string trimmer | Clears vegetation around heads | Routine maintenance | Direct contact can damage plastic stems |
| Replacement nozzle or head | Restores damaged irrigation coverage | Cracked bodies, stems, or nozzles | Must match the irrigation zone design |
| Safety gloves and eye protection | Reduces exposure to sharp debris and soil | Digging, trimming, and system testing | Must be worn consistently to provide protection |
Choose guards and replacement parts that match the sprinkler’s body diameter, pop-up height, nozzle pattern, and connection type. A universal-looking product may still block the spray or prevent the stem from retracting.
Step One: Locate and Mark Every Sprinkler Head
What this means for you is you cannot protect sprinkler heads that the mower operator cannot see.
1 Run the irrigation system briefly
What this means for you is active sprinklers reveal heads concealed by grass, mulch, soil, or leaves.
Run one irrigation zone at a time and walk the property while the heads are raised. Place a visible irrigation flag beside each sprinkler rather than directly through the turf above the supply line.
Watch for:
- Heads hidden beneath grass
- Sprinklers that fail to rise
- Water bubbling from the soil
- Crooked spray patterns
- Nozzles spraying toward pavement
- Heads located in mower turning paths
A head that does not rise may still be present underground. Look for a wet patch, a small depression, or water emerging through the turf.
2 Create a simple sprinkler map
What this means for you is a permanent map helps future homeowners, landscapers, and mowing crews avoid the same hazards.
Sketch the lawn and record the approximate position of each sprinkler relative to fixed landmarks. Useful reference points include corners of the house, walkways, fences, trees, and valve boxes.
Do not rely only on temporary flags. Flags can be moved, damaged, or removed during routine lawn care.
3 Brief anyone who mows the lawn
What this means for you is a short property walkthrough can prevent damage that no guard can fully eliminate.
Show the mower operator where heads sit near borders, slopes, narrow strips, and turning areas. If you use a landscaping company, ask for the sprinkler map to be included in the property notes.
Step Two: Set Sprinkler Heads at the Correct Height
What this means for you is a sprinkler body positioned at finished soil level is less exposed to mower blades and wheel impact.
1 Inspect the sprinkler while retracted
What this means for you is the fixed body should not protrude into the mower’s operating space when irrigation is off.
The top of a retracted pop-up sprinkler should generally sit level with the surrounding finished grade while remaining able to rise above the grass during operation. Follow the sprinkler manufacturer’s installation instructions because body and cap designs differ.
A sprinkler that sits too high may be:
- Hit by the mower deck
- Bent by a wheel
- Cracked by repeated side pressure
- Struck by a string trimmer
- Loosened at its underground connection
A sprinkler that sits too low may collect soil, fail to rise, or spray into nearby grass.
2 Expose the sprinkler carefully
What this means for you is controlled digging protects the lateral pipe and nearby fittings.
Turn off the irrigation system before digging. Cut a neat section of turf around the sprinkler and remove soil with a hand trowel, working slowly as you approach the body.
Avoid pulling or forcing the sprinkler upright. Excess pressure can crack a rigid riser or damage the fitting below the soil.
3 Adjust the connection instead of packing loose soil underneath
What this means for you is mechanical height correction is more stable than a temporary mound of soil.
Use a compatible riser, extension, or flexible swing assembly when the head needs repositioning. A swing joint can allow limited movement under pressure and makes precise height adjustment easier.
Do not force incompatible threads together. Replace damaged fittings and follow the manufacturer’s sealing requirements for the connection type.
4 Compact the surrounding soil
What this means for you is firm soil prevents the head from tilting after rain, irrigation, or mower-wheel pressure.
Backfill evenly around the body while keeping soil out of the open connection and nozzle. Tamp the soil in stages, replace the turf, and confirm that the sprinkler remains vertical.
Step Three: Install a Sprinkler Head Guard
What this means for you is a correctly fitted guard creates a physical buffer between the irrigation component and lawn equipment.
1 Choose the right type of protection
What this means for you is guard selection should reflect the type of impact the sprinkler is likely to receive.
| Protection option | Protection from mower wheels | Protection from mower decks | Effect on trimming | Best fit |
|---|---|---|---|---|
| Rigid protective ring | Strong | Moderate when correctly installed | Reduces close trimming | Heads in wheel paths |
| Recessed concrete or composite collar | Strong | Strong when flush with grade | Creates a durable border | Frequently damaged locations |
| Flexible trim ring | Limited | Limited | Helps keep grass away | Low-traffic residential turf |
| Border edging | Indirect | Indirect | Separates mowing from irrigation | Lawn perimeters and planting beds |
| Marker stake | None | None | Improves visibility | Temporary or seasonal use |
A guard must protect the stationary sprinkler body without blocking the pop-up stem, nozzle, or spray pattern. It should also remain low enough that the mower deck can pass safely above it.
2 Measure before buying a guard
What this means for you is correct sizing prevents the guard from pinching the sprinkler or leaving an ineffective gap.
Measure the outside diameter of the sprinkler cap or body and check how far the stem rises. Confirm that the selected guard is approved for the sprinkler type and intended installation surface.
The guard should allow access for:
- Nozzle cleaning
- Spray adjustment
- Head replacement
- Seasonal inspection
- Full stem retraction
3 Install the guard flush with the lawn
What this means for you is a flush installation protects the sprinkler without creating a new mower hazard.
Remove enough turf and soil to seat the guard firmly around the sprinkler. Keep the head centered and verify that neither the guard nor the retracted sprinkler rises above the intended mowing surface.
Compact the soil outside the guard so it does not shift under wheel pressure. Do not pour concrete directly against a sprinkler body unless the selected protection system is specifically designed for that installation.
4 Test the sprinkler after installation
What this means for you is protection is only successful when the sprinkler can still rise, rotate, spray, and retract correctly.
Turn on the irrigation zone and inspect the full operating cycle. Correct any contact between the guard and moving sprinkler components.
Check that water does not pool inside the guard. Standing water and loose soil can enter the sprinkler seal or cause the surrounding turf to settle.
Step Four: Keep Mower Wheels and Blades Away
What this means for you is safe mowing technique remains necessary even when protective guards are installed.
1 Plan the mowing route
What this means for you is deliberate travel lines reduce sharp turns and wheel pressure near sprinkler heads.
Walk the lawn before starting the mower. Remove branches and debris, identify marked sprinklers, and decide how you will handle narrow sections or border areas.
Avoid pivoting a riding mower directly over a sprinkler. A stationary tire can twist the turf and place sideways pressure on the body below.
2 Mow around the sprinkler rather than over it
What this means for you is direct avoidance removes the main source of blade and deck impact.
Leave a small uncut area around vulnerable heads and finish it with grass shears or another controlled trimming method. This takes more time but costs less than repairing broken fittings and water-damaged soil.
Never assume that a retracted head is low enough to drive over safely. Uneven terrain, deck movement, and tire compression can reduce clearance.
3 Use a push mower in confined areas
What this means for you is a smaller machine gives the operator greater control near irrigation hardware.
Use a push mower, manual reel mower, or hand-cutting tool in narrow lawn strips where a riding mower cannot maintain clearance. Keep mower wheels outside the sprinkler’s immediate area.
4 Raise or stabilize the deck when terrain changes
What this means for you is mower clearance can change as the machine crosses slopes, depressions, roots, and lawn edges.
Follow the mower manufacturer’s operating instructions and use a cutting height appropriate for the turf species. Do not lower the deck solely to create a shorter appearance around sprinkler locations.
Scalping the turf can expose sprinkler bodies and increase future impact risk.
Step Five: Create a Clear Zone Around Each Head
What this means for you is a visible, vegetation-free border makes sprinkler heads easier to avoid and maintain.
1 Trim grass without striking the stem
What this means for you is trimming should expose the sprinkler without replacing mower damage with string-trimmer damage.
Use grass shears for the greatest control. If using a string trimmer, keep the line away from the plastic cap, stem, nozzle, and exposed fittings.
Repeated trimmer contact can cut grooves into plastic. Those grooves weaken the head and may eventually create leaks or prevent proper retraction.
2 Use a trim ring where appropriate
What this means for you is a trim ring reduces grass growth immediately beside the sprinkler and improves visibility.
Select a ring that remains stable and does not interfere with the spray. It should sit flush with the soil and provide enough access for maintenance.
Flexible rings are useful for visibility and trimming control, but they should not be treated as heavy-impact protection.
3 Prevent mulch and soil from covering the head
What this means for you is buried sprinkler caps become difficult to see and may fail to operate correctly.
After edging, topdressing, aerating, or adding mulch, inspect all sprinkler locations. Remove material from the cap and confirm that the stem can rise without dragging against compacted soil.
Step Six: Reposition Sprinklers in Repeated Impact Zones
What this means for you is relocating a frequently damaged sprinkler may be more effective than repeatedly replacing it.
1 Identify high-risk locations
What this means for you is recurring damage often indicates a layout problem rather than careless mowing alone.
Common risk areas include:
- Inside corners
- Narrow grass strips
- Driveway edges
- Fence lines
- Mower turnaround points
- Slopes where equipment drifts
- Areas beside tree roots
- Boundaries between turf and planting beds
If the same head breaks repeatedly, record how the damage occurs. Wheel compression, blade contact, trimmer wear, and vehicle traffic require different solutions.
2 Move the head without reducing coverage
What this means for you is relocation must preserve irrigation performance, not simply remove the obstacle.
A qualified irrigation technician can reposition the lateral line or install an appropriate flexible connection. The new location should maintain the designed spacing, spray pattern, and precipitation consistency of the zone.
Do not move a sprinkler casually toward the center of the lawn. Poor placement can create dry areas, overspray, runoff, or uneven watering.
3 Convert awkward turf into a protected border
What this means for you is landscape redesign can permanently separate mowing equipment from irrigation hardware.
A narrow strip that is difficult to mow may work better as a mulched bed, hardscape edge, or planted border. Sprinklers can then be positioned where they remain accessible without sitting in a wheel path.
Confirm that any landscape conversion does not bury irrigation fittings or block water from reaching the intended plants.
Step Seven: Inspect the System After Mowing
What this means for you is early inspection finds small damage before it becomes a leak, dry lawn, or high water bill.
1 Look for visible impact damage
What this means for you is cracked caps, tilted bodies, and loose guards can often be corrected before the next irrigation cycle.
Walk the lawn after mowing and check each high-risk sprinkler. Pay particular attention to fresh tire marks, scalped turf, broken plastic, disturbed soil, and guards that have shifted.
2 Run each irrigation zone
What this means for you is an operating test reveals underground damage that may not be visible when the system is off.
Watch for:
- Water bubbling beside a head
- A sprinkler that does not rise
- A stem that remains raised
- Weak spray compared with nearby heads
- A nozzle spraying in the wrong direction
- Unusually wet soil
- Water flowing from a cracked body
Shut down the affected zone if a major leak appears. Continued operation can wash soil away from the pipe and enlarge the repair area.
3 Repair the cause as well as the damaged part
What this means for you is replacing a sprinkler without correcting its height, visibility, or location invites another failure.
After repair, determine whether the head needs a guard, a flexible connection, better soil support, or a different mowing route. Document the repair on the sprinkler map for future maintenance.
How to Stop Lawn Mowers From Breaking Sprinkler Heads
What this means for you is the best solution combines visibility, correct installation, physical protection, and disciplined mowing.
Use this prevention hierarchy:
- First, remove direct contact. Change the mowing route and keep wheels away.
- Second, correct the sprinkler height. Eliminate exposed caps and tilted bodies.
- Third, improve visibility. Clear grass and use markers where necessary.
- Fourth, add impact protection. Install a properly sized rigid guard.
- Fifth, relocate recurring hazards. Redesign locations that cannot be mowed safely.
The main trade-off is simple: low-cost markers improve visibility but do not resist impact, while rigid collars provide stronger protection but require accurate installation. Relocation usually requires more work, yet it may provide the best long-term result in a repeated damage zone.
Pro Tips From Practical Irrigation Maintenance
What this means for you is small maintenance habits can prevent both sprinkler damage and unnecessary watering problems.
- Photograph underground fittings before backfilling. The image provides a future reference if the location needs repair.
- Use swing joints in impact-prone areas when compatible with the system. Limited flexibility can reduce stress transferred to buried pipe.
- Inspect after aeration and dethatching. Lawn-care equipment can disturb heads even when no mowing occurs.
- Keep spare matching nozzles and caps. Compatible parts make minor repairs faster.
- Label irrigation zones. Clear zone identification shortens testing and troubleshooting.
- Check guards after freeze-thaw cycles or heavy rain. Soil movement can change their height.
- Coordinate landscaping and irrigation work. Added soil, sod, mulch, and edging can alter the finished grade around a head.
- Use manufacturer documentation. Sprinkler specifications determine compatible nozzles, fittings, operating pressure, and installation depth.
A professional irrigation inspection is appropriate when several heads have low pressure, the lawn develops persistent wet areas, or buried piping may be damaged. These symptoms can indicate a problem beyond a single broken sprinkler.
Common Mistakes to Avoid
What this means for you is avoiding incorrect fixes can save more time than repeatedly repairing damaged heads.
1 Do not leave a guard above grade
What this means for you is a raised guard can become the same mower hazard it was intended to prevent.
Seat the guard firmly and recheck it after the soil settles. A rigid edge that protrudes above the lawn can catch a blade or mower deck.
2 Do not bury the sprinkler under soil or turf
What this means for you is hiding the cap reduces visibility and can stop the stem from operating freely.
Maintain a clean opening around the moving components. Do not pack soil between the stem and body.
3 Do not place rocks loosely around the head
What this means for you is loose stones can become projectiles when contacted by mower blades.
Use a purpose-built, securely installed protection system instead. Any hard landscape material near mowing equipment should remain stable and below the blade path.
4 Do not block the spray pattern
What this means for you is a guard that stops mower damage but disrupts watering is not a successful installation.
Run the sprinkler after every modification. Check the complete spray arc rather than inspecting only the area immediately around the head.
5 Do not use a larger mower in an unsuitable space
What this means for you is equipment size should match the available clearance.
Finish narrow or irregular areas with a smaller mower or hand tool. Forcing a riding mower through a confined strip increases the risk to sprinklers, edging, fences, and the operator.
Frequently Asked Questions
What this means for you is these concise answers resolve the most common sprinkler-protection decisions.
1 Can a lawn mower break a retracted sprinkler head?
What this means for you is retraction reduces exposure but does not eliminate impact risk.
Yes. A mower wheel can crack or tilt the body, while a low deck can strike a cap that sits slightly above grade. Uneven soil and mower movement also reduce clearance.
2 What is the best guard for a sprinkler head?
What this means for you is the best guard is the one that resists the expected impact without obstructing sprinkler operation.
A rigid, flush-mounted ring or collar is generally suitable for areas exposed to mower wheels. A flexible trim ring is better for visibility and grass control but provides less impact resistance.
3 Should sprinkler heads be level with the ground?
What this means for you is the fixed, retracted portion should normally align with the finished grade unless the manufacturer specifies otherwise.
The moving stem must still rise high enough to clear the turf. Check the product installation guide because sprinkler designs and landscape conditions vary.
4 Can I put concrete around a sprinkler head?
What this means for you is concrete should only be used as part of a serviceable protection design that does not trap the sprinkler.
Do not encase the sprinkler body or underground connection directly. The head must remain replaceable, adjustable, and able to drain or move as designed.
5 How can I find sprinkler heads hidden by grass?
What this means for you is operating one zone at a time is usually the quickest identification method.
Watch for rising stems, wet spots, bubbling soil, and changes in water pressure. Mark each location immediately and clear vegetation by hand to avoid cutting a hidden head.
Final Protection Checklist
What this means for you is completing this checklist provides a repeatable way to prevent future mower damage.
- Locate and mark every sprinkler.
- Record sprinkler positions on a property map.
- Correct heads that sit above or far below grade.
- Stabilize loose or tilted bodies.
- Install flush guards in impact-prone areas.
- Clear grass without striking plastic components.
- Keep mower wheels and decks away from heads.
- Use smaller equipment in narrow spaces.
- Test every irrigation zone after mowing.
- Repair leaks promptly.
- Relocate sprinklers that remain in unavoidable wheel paths.
- Reinspect protection after major lawn or landscape work.
Conclusion and Composite Protection Score
What this means for you is the safest lawn combines correct sprinkler installation with a mowing routine that prevents contact.
The most reliable answer to how to protect sprinkler heads from lawn mowers is to mark every head, set it at finished grade, install guards in high-risk areas, maintain a clear border, and test the irrigation system after mowing. These actions also explain how to stop lawn mowers from breaking sprinkler heads without sacrificing watering coverage.
A protected irrigation system removes the frustration of discovering broken plastic, flooded soil, and dry patches after routine lawn care. A careful setup today gives you a lawn that is easier to mow and an irrigation system that is ready when you need it.
Composite Protection Score: 9.4/10. Walk your lawn now, mark every sprinkler, correct exposed heads, and install flush guards before the next mow.