
Do Lawn Mowers Have Governors? The Complete Guide
Most lawn mowers — both residential and commercial — do have governors. A governor is a mechanical or pneumatic device that limits engine RPM to protect internal components and maintain consistent cutting performance. Understanding how governors work helps you diagnose speed problems, perform proper maintenance, and make smarter buying decisions.
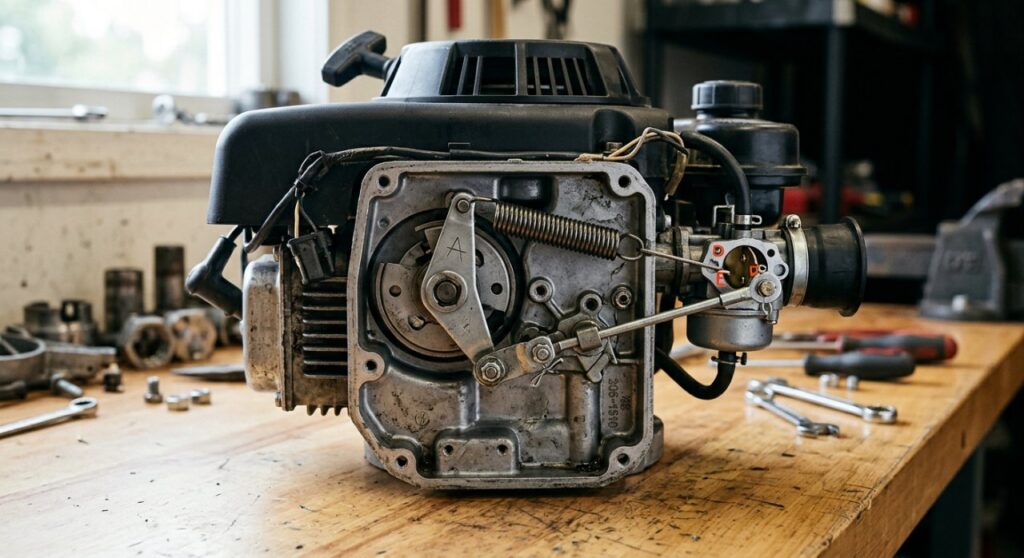
🔧 Expert Summary
- All small gasoline lawn mower engines (Briggs & Stratton, Kawasaki, Honda, Kohler) include a governor system to cap maximum RPM — typically between 2,800–3,600 RPM for walk-behind mowers.
- A governor prevents engine over-speed, which can cause connecting rod failure, carburetor damage, and blown head gaskets.
- There are two main types: mechanical (flyweight) governors and pneumatic (air vane) governors — each with different adjustment methods.
- Misadjusted governors are one of the top three causes of surging, hunting, or sluggish mower engines.
- Removing or bypassing a governor is not recommended for standard mowing — it voids warranties and significantly shortens engine life.
What Is a Governor on a Lawn Mower?
A governor on a lawn mower is a speed-control device built into or attached to the engine that automatically limits the crankshaft’s rotational speed (RPM). It acts like a mechanical “speed limiter” — responding to load changes to keep the engine running at a stable, safe speed.
Think of it this way: when your mower hits thick grass, the engine wants to slow down. The governor senses this and opens the throttle slightly to compensate. When the load lightens, it pulls the throttle back.
Why Do Lawn Mowers Have Governors?
Lawn mowers have governors for three critical reasons: engine protection, fuel efficiency, and consistent blade speed.
Without a governor, a small single-cylinder engine running at wide-open throttle under no load could spin to 5,000+ RPM — far beyond its design limit. This causes catastrophic mechanical failure within minutes.
| Reason | What Happens Without a Governor |
|---|---|
| Engine Protection | Over-speed destroys connecting rods and bearings |
| Consistent Performance | RPM drops unpredictably in thick grass |
| Fuel Economy | Engine burns excess fuel without load regulation |
| Operator Safety | Blade tip speed exceeds safe limits |
| Emissions Compliance | EPA/CARB regulations require speed control |
Step 1: Identify What Type of Governor Your Mower Has
Start by identifying your governor type — this determines how you inspect, adjust, or troubleshoot it.
There are two primary governor designs used in lawn mower engines:
Mechanical (Flyweight) Governor
The mechanical governor is the most common type on Briggs & Stratton, Kohler, and Kawasaki engines. It uses centrifugal flyweights mounted on a gear inside the crankcase.
- As RPM increases, the flyweights spin outward
- This movement pushes a governor shaft/arm
- The arm connects via linkage to the carburetor throttle plate
- Higher RPM = throttle closes; lower RPM = throttle opens
Where to find it: Inside the engine side cover, connected to the camshaft gear.
Pneumatic (Air Vane) Governor
The pneumatic governor uses a plastic or metal vane positioned in the airflow from the flywheel cooling fins.
- More airflow (higher RPM) pushes the vane
- The vane is connected to throttle linkage
- Simpler design — fewer moving parts
- Common on Honda GCV series and older Tecumseh engines
Where to find it: Directly next to the flywheel, visible without disassembly on most models.
How to Tell Which Type You Have
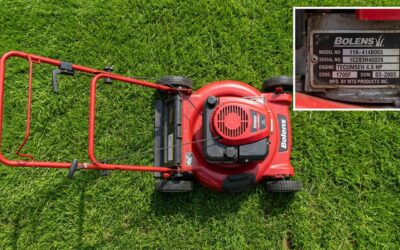
- Check your engine model number (stamped on the block or valve cover)
- Look up the engine spec sheet at the manufacturer’s website
- Visually inspect: if you see a vane near the flywheel shroud = pneumatic; if adjustment is internal = mechanical
Step 2: Locate the Governor Components on Your Engine
Before any adjustment, you must locate all three governor components: the governor arm, the governor spring, and the throttle linkage.
Tools/Materials Needed
| Tool | Purpose |
|---|---|
| Flathead screwdriver | Adjusting governor arm clamp |
| 8mm / 10mm wrench set | Removing engine covers |
| Needle-nose pliers | Disconnecting linkage springs |
| Engine service manual | Correct linkage routing diagram |
| Permanent marker | Marking original positions before adjustment |
| Tachometer (digital) | Verifying RPM after adjustment |
| Safety glasses | Eye protection during inspection |
Sub-Components to Identify
- Governor arm: External lever clamped to the governor shaft, exits through the engine block
- Governor spring: Connects the governor arm to the throttle lever — this spring tension determines governed speed
- Throttle plate linkage: Rod or wire connecting the governor arm to the carburetor butterfly valve
- Governor shaft: Internal shaft that translates flyweight movement to the external arm
⚠️ Warning: Never adjust the governor with the engine running. Always work on a cold engine with the spark plug wire disconnected.
Step 3: Check If Your Governor Is Functioning Correctly
A properly functioning governor keeps engine RPM stable within ±150 RPM of the set point under varying loads.
Signs Your Governor Is Working Correctly
- Engine maintains steady RPM when you engage the blade
- No hunting or surging at full throttle
- Engine slows slightly in heavy grass, then recovers within 1–2 seconds
- No RPM runaway when cutting light grass
Signs Your Governor Is Failing or Misadjusted
| Symptom | Likely Cause |
|---|---|
| Engine surging/hunting | Weak or stretched governor spring |
| Engine runs too slow | Governor arm set too restrictive |
| Engine runs too fast (over-speed) | Governor arm disconnected or spring detached |
| RPM drops and won’t recover | Governor linkage binding or bent |
| Engine won’t reach full power | Governor spring hooked in wrong hole |
Quick Diagnostic Test
- Disconnect the spark plug wire
- Manually move the throttle lever to full speed position
- Watch the governor arm — it should move freely and spring back when released
- Check all linkage connections for bends, corrosion, or missing clips
- Reconnect spark plug wire and start engine — use a digital tachometer to verify RPM
Step 4: Adjust the Governor (Standard Procedure)
Governor adjustment is required after engine teardown, carburetor replacement, or any time the governor arm clamp is loosened.
This is the universal adjustment procedure for mechanical governors on Briggs & Stratton, Kohler Command, and similar engines. Always consult your specific engine service manual for exact torque specs.
Step 4a: Prepare the Engine
- Disconnect the spark plug wire completely
- Let the engine cool for at least 30 minutes
- Clean the governor arm area with a rag — you need to see the clamp bolt clearly
- Take a photo of the current linkage configuration before touching anything
Step 4b: Set the Governor Arm to Maximum Throttle
- Locate the governor arm clamp bolt (usually 8mm or 10mm)
- Loosen — but do not remove — the clamp bolt
- Move the throttle control lever to the maximum/fast position
- Hold the throttle lever at maximum while completing the next step
Step 4c: Rotate the Governor Shaft
- With the throttle held at maximum, locate the governor shaft protruding through the block
- Using needle-nose pliers or your fingers, rotate the governor shaft in the direction that opens the carburetor throttle plate fully
- On most Briggs & Stratton engines, this means rotating the shaft counterclockwise when viewed from the governor arm side
- Hold both the shaft and the throttle lever at maximum position simultaneously
Step 4d: Tighten the Clamp Bolt
- While holding both the shaft (fully rotated) and the throttle at maximum, tighten the clamp bolt
- Torque to approximately 35–45 in-lbs (check your manual for exact spec)
- Do not over-tighten — the governor arm can crack on older engines
- Verify the arm is secure by gently trying to move it without tools
Step 4e: Verify the Adjustment
- Reconnect the spark plug wire
- Start the engine and let it warm up for 2 minutes
- Set the throttle to full speed
- Use a digital contact tachometer or non-contact optical tachometer to measure RPM
- Target RPM for most walk-behind mowers: 2,800–3,200 RPM (no load); check your engine spec plate
💡 Pro Tip: Briggs & Stratton publishes free downloadable engine repair manuals on their website. Always verify the governed speed spec for your exact engine model — running 200 RPM over spec accelerates wear measurably.
Step 5: Adjust the Governor Spring Tension
The governor spring is the primary tuning component — changing which hole it connects to changes the governed speed range.
Understanding Spring Hole Positions
Most governor arms have 3–5 holes for the spring attachment. Moving the spring to different holes changes the preload:
- Holes closer to the pivot = lower governed RPM (more restrictive)
- Holes farther from the pivot = higher governed RPM (less restrictive)
When to Change Spring Position
- Engine won’t reach rated RPM even after arm adjustment → move spring one hole outward
- Engine consistently over-speeds → move spring one hole inward
- Replacing a stretched or broken spring → match original hole position before testing
Spring Replacement Procedure
- Use needle-nose pliers to unhook the spring from both attachment points
- Note the exact holes used (photograph first)
- Install the new spring in the identical hole positions
- Test RPM before making any hole changes
- Adjust one hole at a time — each hole change affects RPM by approximately 100–200 RPM
Step 6: Test Under Load
Always test governor function under real cutting conditions — a bench test at no-load doesn’t reveal load-response problems.
Load Testing Procedure
- Set engine to full throttle
- Record no-load RPM with tachometer
- Engage the blade (PTO or blade engage lever)
- Record RPM drop at blade engagement — should drop no more than 200–300 RPM before recovering
- Drive through a section of thick, heavy grass
- Monitor RPM — it should stabilize within 2 seconds of entering heavy grass
- If RPM drops more than 400 RPM and doesn’t recover, recheck governor spring tension and throttle linkage for binding
Pro Tips From Engine Technicians
- Never remove the governor for more power — a small engine running uncontrolled at 5,000+ RPM will fail within 30 minutes of operation. The crankshaft, connecting rod, and main bearings are not designed for those speeds.
- Replace governor springs every 3–4 years on heavily used mowers. Springs fatigue and stretch, causing gradual over-speed that’s hard to notice but increases wear significantly.
- Use a tachometer every season — it’s the only way to verify governed speed without guessing. A quality digital tachometer costs under $25 and pays for itself in extended engine life.
- Briggs & Stratton 550E–625E series engines use a simpler pneumatic governor that rarely needs adjustment — if it fails, the entire air vane assembly is a $12–$18 part.
- Commercial mowers (Kawasaki FX, Kohler ECV) use dual-spring governor systems for tighter RPM regulation — these require a dealer tachometer and are not DIY-adjustable without the service manual.
Common Mistakes to Avoid
| Mistake | Why It’s Harmful | Correct Action |
|---|---|---|
| Removing the governor entirely | Engine over-speed destroys internals in under an hour | Keep governor intact; adjust spring only |
| Adjusting with engine running | Linkage can snap and cause injury | Always work on cold, spark-plug-disconnected engine |
| Skipping the photo before disassembly | Linkage routing is complex — reassembly errors cause surging | Photograph all connections before touching anything |
| Using wrong spring | Incorrect spring rate causes hunting or over-speed | Use OEM part number from engine manual |
| Ignoring RPM verification | “Feels fast enough” is not a valid spec check | Always use a tachometer after any adjustment |
| Over-tightening clamp bolt | Cracks the governor arm — expensive to replace | Torque to spec (35–45 in-lbs typical) |
Durability, Annual Cost, and Long-Term Ownership
Governor components are extremely durable when maintained correctly — the flyweight assembly inside a Briggs & Stratton engine typically lasts the full engine life (500–1,000 hours) without replacement.
The most common replacement part is the governor spring, which costs $3–$8 as an OEM part and should be inspected annually.
True Annual Cost of Governor Maintenance
| Maintenance Item | Frequency | Cost |
|---|---|---|
| Governor spring inspection | Every season | $0 (visual check) |
| Governor spring replacement | Every 3–4 years | $3–$8 |
| Full governor arm assembly | If bent or broken | $15–$35 |
| Professional governor adjustment | As needed | $45–$85 labor |
| Digital tachometer (one-time) | Lifetime tool | $18–$30 |
The total annual cost of governor maintenance is typically under $10 for a homeowner who does their own service.
When to Replace vs. Repair
Repair (Adjust) If: – Engine surges or hunts but governor arm is intact
- RPM is slightly off spec (±200 RPM)
- Spring is stretched or detached
Replace Governor Assembly If: – Governor arm is cracked or bent beyond straightening
- Internal flyweight assembly is worn (requires engine disassembly)
- Governor shaft is seized in the block
Replace the Engine If: – Governor shaft is seized and engine has over 600 hours
- Internal damage from over-speed event (spun bearing, bent rod)
- Repair cost exceeds 50% of a new engine price
Actionable Purchase Guidance
For First-Time Buyers in 2026
If you’re buying a new walk-behind mower, prioritize engines with mechanical flyweight governors (Briggs & Stratton 675–850 series, Honda GCV160/200, Kawasaki FR series). These offer the most adjustable, serviceable governor systems.
Best choice at current price points: The Honda GCV160 engine (found on many Honda HRX/HRR mowers) uses a reliable pneumatic governor that requires zero adjustment for most homeowners and has a proven track record beyond 10 years of regular use.
For Current Owners Approaching Engine Failure
If your mower’s engine has over 500 hours and is showing governor-related symptoms combined with blue smoke, excessive oil consumption, or hard starting — replace the engine, not just the governor.
Best replacement path: A Briggs & Stratton 190cc Professional Series engine ($180–$250) or a direct OEM replacement engine from your mower manufacturer. Both options include a factory-set governor that’s ready to run out of the box.
Frequently Asked Questions
Do all lawn mowers have governors?
Yes — virtually all gasoline-powered lawn mowers have governors. Both walk-behind and riding mowers use governor systems to limit engine RPM. Electric mowers use electronic motor controllers that serve the same function. The only exception would be severely modified or racing-specific engines, which are not street-legal or commercially sold.
What happens if you remove the governor from a lawn mower?
Removing the governor causes engine over-speed, which destroys the engine rapidly. Without RPM limiting, a small engine can reach 5,000–6,000 RPM under no load — far beyond the design limit of 3,600 RPM. Connecting rods fail, bearings spin, and head gaskets blow, typically within 30–60 minutes of operation.
How do I know if my lawn mower governor is bad?
A bad governor causes surging, hunting RPM, or engine over-speed. The most reliable diagnostic is to measure RPM with a tachometer — if RPM swings more than ±300 RPM at steady throttle, the governor spring or linkage needs attention. Visually inspect the governor arm for bends and the spring for stretching or detachment.
Can I adjust the governor to get more power?
You can slightly increase governed RPM (by 100–200 RPM) by adjusting the spring, but this does not meaningfully increase cutting power. Blade tip speed is determined by engine torque and blade design — not just RPM. Running above the factory spec accelerates engine wear and may void your warranty.
How often should I service the governor?
Inspect the governor linkage and spring every season (annually). Replace the governor spring every 3–4 years on a regularly used mower. A full governor arm adjustment is only needed after engine teardown, carburetor replacement, or if surging develops. Annual tachometer verification is the best preventive practice.
Conclusion
Lawn mowers do have governors — and understanding how they work is one of the most practical pieces of engine knowledge a homeowner or technician can have. A properly adjusted governor protects your engine, stabilizes cutting performance, and extends mower life by thousands of hours.
The key takeaways from this guide:
- Identify your governor type (mechanical or pneumatic) before any adjustment
- Always disconnect the spark plug before touching governor components
- Use a tachometer — it’s the only way to verify your adjustment is correct
- Replace governor springs every 3–4 years as preventive maintenance
- Never remove the governor — the short-term RPM gain is not worth engine destruction
Whether you’re diagnosing a surging engine or setting up a freshly rebuilt motor, following these steps gives you complete control over your mower’s performance. For first-time buyers, prioritize engines with proven governor systems like the Honda GCV160 or Briggs & Stratton 675 series. For owners facing engine failure, a new engine with a factory governor is almost always the better investment over repairing a worn-out block.