
What Gauge Wire Is Used on Lawn Mowers? The Complete Guide
Most lawn mower wiring uses 18 AWG to 10 AWG wire, depending on the circuit. Getting the gauge wrong can cause blown fuses, melted insulation, or a mower that won’t start — so matching wire size to amperage load is the single most important wiring decision you’ll make.
⚡ Expert Summary
- Riding mower battery cables typically use 4–6 AWG wire to handle the starter motor’s high current draw (100–200A peak).
- Ignition, safety switch, and accessory circuits on most mowers use 16–18 AWG wire, carrying under 10 amps.
- Charging circuits (stator to battery) use 14–16 AWG on most single-cylinder engines.
- The lower the AWG number, the thicker the wire — thicker wire handles more current without overheating.
- Using wire that is too thin for a circuit is a fire and failure risk; always match gauge to the circuit’s amperage, not just what “looks similar.”
Step 1: Understand the AWG System Before Touching Any Wire
AWG (American Wire Gauge) runs in reverse: 4 AWG is much thicker than 18 AWG.
This confuses most first-time DIYers. A 4 AWG cable is roughly 5mm in diameter. An 18 AWG wire is about 1mm. On a lawn mower, you will encounter both extremes — sometimes within inches of each other.
The key formula to remember: every 6 AWG steps doubles (or halves) the current capacity. So 10 AWG carries roughly twice as much current as 16 AWG at the same temperature rating.
Why This Matters for Lawn Mowers Specifically
Lawn mowers run in hot, vibration-heavy environments. Undersized wire generates heat, which degrades insulation faster than any other factor.
A wire that handles its rated amperage in a controlled shop will run significantly hotter strapped against an engine block on a 95°F day. Always size up one gauge when routing wire near heat sources.
Step 2: Identify Every Circuit on Your Mower and Its Current Draw
Each electrical circuit on a lawn mower has a different amperage requirement — and therefore a different correct wire gauge.
Before you buy a single foot of wire, map out which circuit you are working on. Buying the wrong spool wastes money and creates hazards.
Common Lawn Mower Circuits and Correct Wire Gauges
| Circuit | Typical Amperage | Recommended AWG | Wire Type |
|---|---|---|---|
| Battery positive cable (riding mower) | 100–200A (cranking) | 4–6 AWG | Stranded, SAE J1127 |
| Starter solenoid to starter motor | 80–150A | 6–8 AWG | Stranded, insulated |
| Charging circuit (stator/alternator to battery) | 5–15A | 14–16 AWG | Stranded |
| Ignition switch circuit | 3–8A | 16–18 AWG | Stranded |
| Safety switches (seat, blade, bail) | Under 5A | 18–20 AWG | Stranded |
| Headlights / accessories | 5–10A | 16–18 AWG | Stranded |
| Spark plug kill wire (push mower) | Under 1A | 18 AWG | Often solid core |
| Electric PTO clutch | 8–12A | 14–16 AWG | Stranded |
| Ground cables (main chassis) | Matches positive cable | 4–6 AWG | Stranded |
Quick rule: If you are unsure, check the fuse or circuit breaker protecting that circuit. Size the wire to handle 125% of the fuse rating at minimum. A 10A fuse = wire rated for at least 12.5A continuous.
Step 3: Locate and Read Your Mower’s Wiring Diagram
The fastest way to confirm wire gauge is to pull the OEM wiring diagram — not guess by color.
Most manufacturers publish diagrams free on their websites or embed them in the owner’s manual. For Husqvarna, John Deere, Cub Cadet, Craftsman, Toro, and Ariens, search “[brand] + model number + wiring diagram.”
How to Read a Lawn Mower Wiring Diagram
- Find the wire color legend. Most diagrams use color abbreviations: R = Red, B = Black, G = Green, W = White, Y = Yellow, BL = Blue, OR = Orange.
- Locate the component you are working on (starter, ignition switch, PTO, etc.).
- Trace the wire back to its source — battery positive, chassis ground, or fuse block.
- Note the wire designation number, if shown. Some diagrams list AWG directly.
If no gauge is listed on the diagram, use the circuit amperage table above as your guide.
Step 4: Gather the Right Tools and Materials
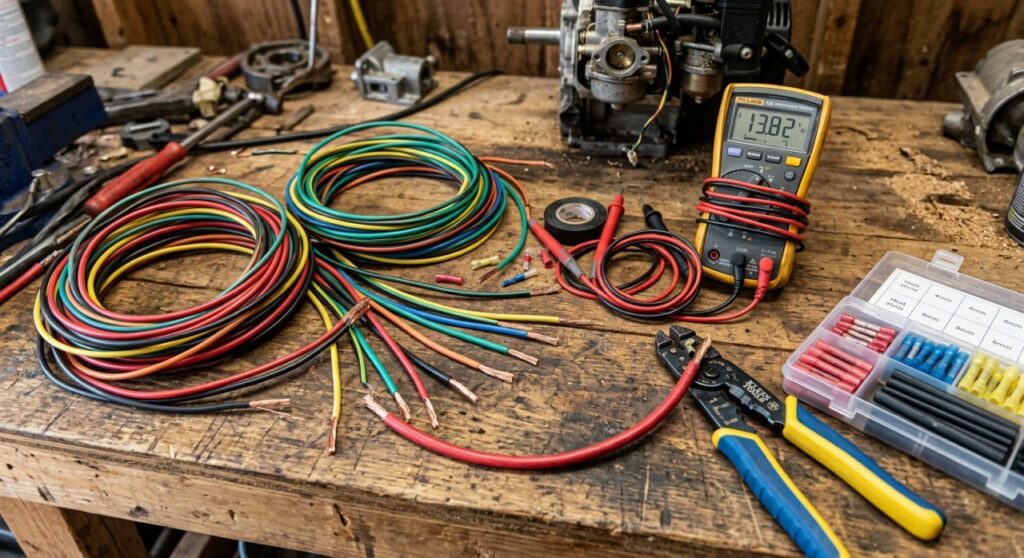
Using the correct crimp terminals and stripping tools is just as important as selecting the right gauge wire.
Loose connections on undersized terminals cause more lawn mower electrical failures than bad wire gauge choices.
Tools and Materials Needed
| Item | Purpose | Notes |
|---|---|---|
| Wire stripper (10–22 AWG) | Remove insulation cleanly | Adjustable type covers all mower gauges |
| Ratcheting crimp tool | Secure terminal connectors | Don’t use pliers — cold crimp joints fail |
| Heat shrink butt connectors | Splice wires weatherproof | Use adhesive-lined for outdoor use |
| Multimeter | Test continuity and voltage | Essential for diagnosing before replacing |
| Wire gauge tool (or calipers) | Confirm existing wire size | Measure bare copper diameter |
| 12V automotive wire (stranded) | Replacement wire | Use SAE or SAE J1128 rated |
| Marine-grade wire (optional) | High-moisture environments | Tinned copper resists corrosion better |
| Electrical tape or split loom | Protect repaired sections | Split loom is better near heat |
| OEM wiring diagram | Reference for routing | Print or keep on phone |
Step 5: Measure Existing Wire Gauge Accurately
Never assume a wire’s gauge by color alone — colors are not standardized across mower brands.
Two red wires on the same mower can be 6 AWG and 18 AWG. Always measure before ordering replacement wire.
How to Measure Wire Gauge Without a Gauge Tool
- Strip 1 inch of insulation from the wire end.
- Measure the bare copper diameter with digital calipers in millimeters.
- Match to the AWG conversion table below.
| Bare Copper Diameter (mm) | AWG | Common Mower Use |
|---|---|---|
| 5.19 mm | 4 AWG | Main battery cable |
| 4.11 mm | 6 AWG | Battery/ground cable |
| 3.26 mm | 8 AWG | Starter lead |
| 2.59 mm | 10 AWG | Heavy ground, PTO |
| 1.63 mm | 14 AWG | Charging circuit |
| 1.29 mm | 16 AWG | Ignition, lights |
| 1.02 mm | 18 AWG | Safety switches |
| 0.81 mm | 20 AWG | Small signal wires |
Pro tip: Count the strands and measure one strand if calipers won’t fit the full conductor. Strand count also helps identify wire class (Class B = 7 strands, Class K = 19+ strands for flexibility).
Step 6: Select the Right Replacement Wire
Match three things: AWG, insulation rating, and conductor type.
Choosing the Right Insulation
Most lawn mower OEM wire uses GPT (General Purpose Thermoplastic) insulation rated at 60°C (140°F). Near the engine block, upgrade to SGX or GXL insulation, which is rated to 125°C (257°F) and resists oil, fuel, and abrasion far better.
For blade and PTO circuits, SGX insulation is strongly recommended — these wires see vibration and occasional heat spikes simultaneously.
Stranded vs. Solid Wire for Mowers
Always use stranded wire on mowers. Solid copper wire is designed for fixed residential wiring that never moves.
Mower wires flex every time the deck vibrates, the steering wheel turns, or the engine moves on its mounts. Solid wire work-hardens and cracks at flex points within one or two seasons.
Step 7: Replace or Repair the Wiring Correctly
A proper repair requires at minimum a heat-shrink crimp splice, not electrical tape alone.
Electrical tape fails outdoors. It absorbs moisture, unravels in heat, and leaves adhesive residue that attracts debris. Every splice on a mower should be sealed.
Step-by-Step Wire Splice Procedure
- Cut out the damaged section — remove at least 1 inch of wire on each side of any burn, chafe, or corrosion.
- Strip 3/4 inch of insulation from each end using the correct gauge slot on your stripper.
- Slide a piece of heat shrink tubing over one wire end before crimping (easy to forget this step).
- Insert both wire ends into a heat-shrink butt connector of the correct gauge range (e.g., a 16–14 AWG connector for 16 AWG wire).
- Crimp both ends fully with a ratcheting crimp tool — two crimps per connector.
- Tug-test the connection — it should not pull free with firm hand pressure.
- Shrink the connector with a heat gun or lighter (heat gun preferred for uniform shrink).
- Re-route and secure the repaired section away from sharp edges and heat sources using split loom or cable ties.
Step 8: Test Before Reassembly
Continuity testing before closing up the mower saves you from reassembling it twice.
Set your multimeter to continuity mode (the diode/speaker symbol). Touch probes to each end of the repaired wire. A solid tone or near-zero reading confirms a good connection.
For battery cables and starter circuits, also perform a voltage drop test under load:
- Connect the battery fully.
- Set the multimeter to DC volts.
- Place probes at each end of the wire being tested.
- Crank the engine while reading the meter.
- Acceptable voltage drop: under 0.5V for most circuits; under 0.1V for battery cables.
A higher reading indicates resistance — from a bad crimp, undersized wire, or corrosion.
Pro Tips From the Field
- Tinned copper wire is worth the extra cost on riding mowers stored outdoors or in humid climates. Tinned strands resist the green oxidation that increases resistance over time.
- Label every wire you disconnect with masking tape and a marker before you start any repair. Lawn mower harnesses have 15–30 wires in close proximity and they all look similar after years of grime.
- Buy wire in 25-foot spools, not by the foot. You will almost always need more than you think, and a spool is cheaper per foot.
- Replace the full run, not just the damaged section, when a battery cable shows corrosion. Corrosion spreads under insulation and re-emerges 6 months later.
- Zip-tie wire harnesses every 6–8 inches when routing near the deck or engine. Unsupported wire chafes against metal edges and fails within a season.
Common Mistakes to Avoid
Using household extension cord wire to repair mower circuits is one of the most frequent DIY errors. Extension cord wire is solid or fine-strand and not rated for engine bay temperatures or vibration.
Here are the mistakes that cause the most callbacks and repeat failures:
- ❌ Using solid wire instead of stranded — cracks at vibration points within one season
- ❌ Matching insulation color instead of measuring gauge — colors are not standardized
- ❌ Skipping the heat-shrink seal on outdoor splices — moisture causes corrosion failure within months
- ❌ Upsizing to a thicker wire without checking connector terminal fit — oversized wire won’t seat in a terminal and creates a loose connection
- ❌ Running new wire over sharp chassis edges without a grommet or loom — abrasion creates shorts
- ❌ Replacing only the wire but not the corroded terminal — 80% of resistance problems live at the terminal, not the wire itself
Frequently Asked Questions
What gauge wire is used on riding lawn mowers for the battery?
Riding mower battery cables are typically 4 AWG or 6 AWG. The starter motor draws 100–200 amps during cranking, requiring heavy-gauge cable to prevent voltage drop and heat buildup. Using thinner wire on a starter circuit risks melting insulation or a no-start condition.
Can I use automotive wire for lawn mower repairs?
Yes — SAE J1128 rated automotive wire is the correct choice for most lawn mower circuits. It comes in the right gauges, uses stranded conductors, and is rated for the temperature and vibration conditions found in small engines. For circuits near the exhaust or engine block, upgrade to GXL or SXL insulation.
What wire gauge is used for safety switches on a lawn mower?
Safety switches (seat switch, blade engagement, operator presence) typically use 18 AWG wire. These circuits carry very low current — under 5 amps — and signal the ignition or PTO control module rather than powering a motor directly.
How do I know if a wire is too small for a lawn mower circuit?
The most reliable sign is heat: if a wire is warm or hot to the touch after the mower runs, it is undersized. Other indicators include a blown fuse that keeps returning, voltage drop greater than 0.5V under load, or discoloration and brittleness in the insulation near connectors.
What gauge wire is used for the PTO clutch on a riding mower?
Electric PTO clutches typically draw 8–12 amps and use 14–16 AWG wire. Because PTO wiring flexes as the deck adjusts and is exposed to debris, use GXL insulation and secure it with split loom conduit along the full run.
Conclusion
Getting wire gauge right on a lawn mower is straightforward once you map each circuit to its amperage load. The core rule: battery and starter cables need 4–6 AWG, charging and PTO circuits need 14–16 AWG, and everything else — ignition, safety switches, lights — lives in the 16–18 AWG range.
The three steps that matter most are measuring the existing wire rather than guessing, using stranded SAE-rated automotive wire rated for at least 125°C near heat sources, and sealing every splice with adhesive-lined heat shrink.
A proper repair done once with the right gauge wire and sealed connections will outlast the mower itself. Do it short and loose, and you are back under the deck next season.